CARTS: Difference between revisions
m ('''Work in progress - this version doesn't work yet''') |
Thecoshman (talk | contribs) (Fixed the tutorial and change the tone of the page. Now it is a page about CARTS with a tutorial, rather then just a tutorial for carts) |
||
| Line 19: | Line 19: | ||
|header3 = | |header3 = | ||
|label3 = Repeaters | |label3 = Repeaters | ||
|data3 = | |data3 = 32 | ||
|header4 = | |header4 = | ||
|label4 = Redstone | |label4 = Redstone | ||
| Line 31: | Line 31: | ||
|below = | |below = | ||
}} | }} | ||
CARTS is a design for a mine-cart station that will allow a player to roll in (or place their mine-cart) onto a launch strip. The player can then press a button and be sent on their merry way to any number of destinations. CARTS will not provide mine-cart storage, it is just a very fancy track selection system. The station can be expanded to accommodate as many destinations as a player would be able to reach and as many as you are able to route outputs from. | CARTS is a design for a mine-cart station that will allow a player to roll in (or place their mine-cart) onto a launch strip. The player can then press a button and be sent on their merry way to any number of destinations. CARTS will not provide mine-cart storage, it is just a very fancy track selection system. The station can be expanded to accommodate as many destinations as a player would be able to reach and as many as you are able to route outputs from. | ||
| Line 46: | Line 40: | ||
This tutorial will show you how to make a CARTS station with eight outputs, due to the design, you can add or remove the outputs to suit your needs. The instructions are written out, but as the saying goes, a picture says a thousands words, so each step has a companion image to show you what you should have so far. Each is taken from roughly the same view point, the rear right corner. Except where noted, all the repeaters are set to the default setting (one tick, shortest delay). | This tutorial will show you how to make a CARTS station with eight outputs, due to the design, you can add or remove the outputs to suit your needs. The instructions are written out, but as the saying goes, a picture says a thousands words, so each step has a companion image to show you what you should have so far. Each is taken from roughly the same view point, the rear right corner. Except where noted, all the repeaters are set to the default setting (one tick, shortest delay). | ||
=== | === Layer One === | ||
Woking from the front to the back, place an eight long strip of blocks, then a row of repeaters facing to the rear of the CARTS system and then another row of blocks. Next, place a zig-zag of repeaters and red-stone dust facing the front of the CARTS system. Finally, place another row of eight blocks, each with a red-stone torch attached to the rear of it; these torches at the rear are the outputs that will use to control the track switching. In total, this layer should be seven blocks deep. | |||
[[File:CartsTutorialStep1.png|thumb|none|400px| | [[File:CartsTutorialStep1.png|thumb|none|400px|Layer one image]] | ||
=== | === Layer Two === | ||
Again working form the front to the back, place an eight long strip of red-stone dust; this is where you take the signal from to launch the player's mine cart. Next a row of blocks followed by a row red-stone torches, this should be standing on the block bellow them not on the side of a block. Next, you need to place a zig-zag of blocks above the eight repeaters you placed in the last step. Finally, place four red stone dust on the last row of blocks placed in layer one, these need to next to blocks that make up the zig-zag not next to the gaps. | |||
[[File:CartsTutorialStep2.png|thumb|none|400px| | [[File:CartsTutorialStep2.png|thumb|none|400px|Layer two image]] | ||
=== | === Layer Three === | ||
Still working form the front, place a row of eight blocks followed by a row of repeaters and then another row of blocks; the repeaters should face the rear of the CARTS system an be set to the maximum delay. You now need to place red stone dust on the eight blocks that make up the zig-zag, with blocks between the red-stone dust in the row towards the front; in other words, one row of alternating blocks and red-stone dust and one row of alternating red-stone dust and an empty block. It is on the front of this layer you will place the selection buttons. | |||
[[File:CartsTutorialStep3.png|thumb|none|400px|Step three image]] | [[File:CartsTutorialStep3.png|thumb|none|400px|Step three image]] | ||
=== | === Layer Four === | ||
At the front of the CARTS system place a two by eight layer of blocks with a row of red stone torches behind it. | At the front of the CARTS system place a two by eight layer of blocks with a row of red stone torches behind it. Then, on the four blocks in the layer below, place a spot of red-stone dust on each. Now place a block in the gaps between these spots of red-stone dust to prevent cross talk. If you have done this right up to now, then you should have four lines of red-stone dust running down in a stepping line. On the front of this layer you would place signs to let people know where each selection will take them. | ||
[[File:CartsTutorialStep4.png|thumb|none|400px|Step four image]] | [[File:CartsTutorialStep4.png|thumb|none|400px|Step four image]] | ||
=== | === Layer Five === | ||
Again, working from the front to the back, place a row of blocks. Then a row of repeaters that face to the front of the CARTS system, behind them another row of blocks. | Again, working from the front to the back, place a row of blocks. Then a row of repeaters that face to the front of the CARTS system, behind them another row of blocks. The front of this layer is where the indicator lights will go, a row of red-stone torches. | ||
[[File:CartsTutorialStep5.png|thumb|none|400px|Step five image]] | [[File:CartsTutorialStep5.png|thumb|none|400px|Step five image]] | ||
=== | === Front interface === | ||
Go to the front of the carts system, place a layer of red-stone torches on the side of the blocks at the very top. These are your indicator lights. You will probably have four of them on when you first place them, don't worry this is because the station has not been used yet. Leave the next row clear for you place signs indicating destination. Next row down, a row of buttons to select your destination. | Go to the front of the carts system, place a layer of red-stone torches on the side of the blocks at the very top. These are your indicator lights. You will probably have four of them on (and four off) when you first place them, don't worry this is because the station has not been used yet. Leave the next row clear for you place signs indicating destination. Next row down, a row of buttons to select your destination. | ||
[[File:CartsTutorialStep6.png|thumb|none|400px|Step six image]] | [[File:CartsTutorialStep6.png|thumb|none|400px|Step six image]] | ||
Revision as of 17:52, 2 February 2012
| Buttons | 8 |
|---|---|
| Redstone torches | 32 |
| Repeaters | 32 |
| Redstone | 36 |
| Rails | ? |
CARTS is a design for a mine-cart station that will allow a player to roll in (or place their mine-cart) onto a launch strip. The player can then press a button and be sent on their merry way to any number of destinations. CARTS will not provide mine-cart storage, it is just a very fancy track selection system. The station can be expanded to accommodate as many destinations as a player would be able to reach and as many as you are able to route outputs from.
This design was created by WaterSlide (or at least worked on a lot by him), I have simply looked at designs in PvE and worked it out from there.
How to make a CARTS station
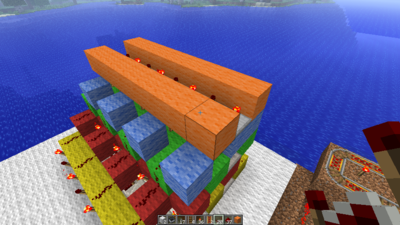
This tutorial will show you how to make a CARTS station with eight outputs, due to the design, you can add or remove the outputs to suit your needs. The instructions are written out, but as the saying goes, a picture says a thousands words, so each step has a companion image to show you what you should have so far. Each is taken from roughly the same view point, the rear right corner. Except where noted, all the repeaters are set to the default setting (one tick, shortest delay).
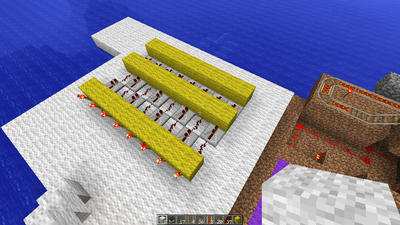
Layer One
Woking from the front to the back, place an eight long strip of blocks, then a row of repeaters facing to the rear of the CARTS system and then another row of blocks. Next, place a zig-zag of repeaters and red-stone dust facing the front of the CARTS system. Finally, place another row of eight blocks, each with a red-stone torch attached to the rear of it; these torches at the rear are the outputs that will use to control the track switching. In total, this layer should be seven blocks deep.
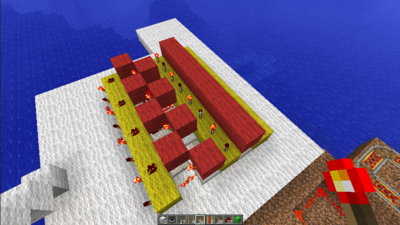
Layer Two
Again working form the front to the back, place an eight long strip of red-stone dust; this is where you take the signal from to launch the player's mine cart. Next a row of blocks followed by a row red-stone torches, this should be standing on the block bellow them not on the side of a block. Next, you need to place a zig-zag of blocks above the eight repeaters you placed in the last step. Finally, place four red stone dust on the last row of blocks placed in layer one, these need to next to blocks that make up the zig-zag not next to the gaps.
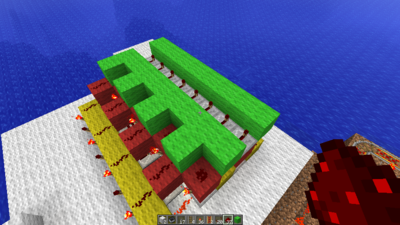
Layer Three
Still working form the front, place a row of eight blocks followed by a row of repeaters and then another row of blocks; the repeaters should face the rear of the CARTS system an be set to the maximum delay. You now need to place red stone dust on the eight blocks that make up the zig-zag, with blocks between the red-stone dust in the row towards the front; in other words, one row of alternating blocks and red-stone dust and one row of alternating red-stone dust and an empty block. It is on the front of this layer you will place the selection buttons.
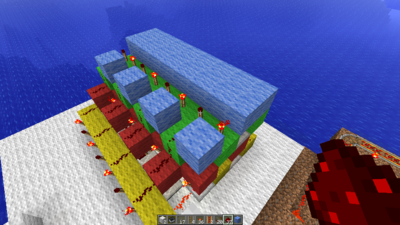
Layer Four
At the front of the CARTS system place a two by eight layer of blocks with a row of red stone torches behind it. Then, on the four blocks in the layer below, place a spot of red-stone dust on each. Now place a block in the gaps between these spots of red-stone dust to prevent cross talk. If you have done this right up to now, then you should have four lines of red-stone dust running down in a stepping line. On the front of this layer you would place signs to let people know where each selection will take them.
Layer Five
Again, working from the front to the back, place a row of blocks. Then a row of repeaters that face to the front of the CARTS system, behind them another row of blocks. The front of this layer is where the indicator lights will go, a row of red-stone torches.
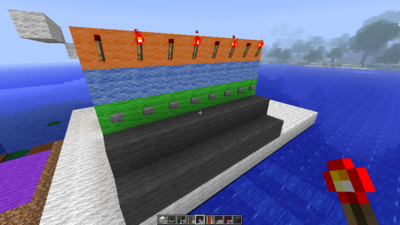
Front interface
Go to the front of the carts system, place a layer of red-stone torches on the side of the blocks at the very top. These are your indicator lights. You will probably have four of them on (and four off) when you first place them, don't worry this is because the station has not been used yet. Leave the next row clear for you place signs indicating destination. Next row down, a row of buttons to select your destination.
Congratulations
You have now builts your basic CARTS system! Though here are some more steps to help you get your system up and running.
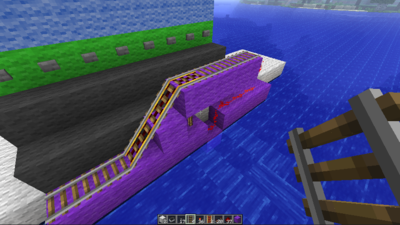
The launch strip
You will need to invert the signal that comes from the line of red stone dust at the front, and send this to a block that has a red-stone torch on it. The red-stone torch should be under a block with a sloping section of booster track. The torch, and thus the booster, will normally be off, holding the mine cart on the slope; when a button is pressed it will turned on for a second or two, long enough to lanuch the player.
Managing the outputs
Soon to come :D
