PvE Information Guide
 | |
| Server address | pve.nerd.nu / p.nerd.nu |
|---|---|
| Current map revision | 20 |
| Map revision started | 14th April, 2017 |
New Features
Our PvE server is on it's 20th map reset, and with it came a great deal of changes to the server environment. You can find all of the changes in the information post here on the subreddit. A few of these changes require a bit more detail:
The Map
The map this rev is a gargantuan 9000x9000. It was made by Cujobear, who has produced a beautiful world with all new terrain generation tools. The nether is 4000x4000, and the end is 4500x4500.
World Border
We're using the vanilla world border this rev. Some naughty people were using an exploit involving the old WorldGuard plugin to teleport to spawn; this is not approved behavior!
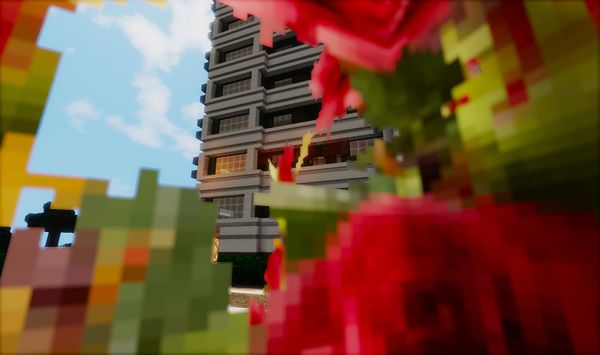
As you approach the border now, you will now be able to SEE the world border, and your screen will turn red as you approach it!
PvE Information Guide
This page contains information pertaining to the p.nerd.nu server. Enjoy!
Arenas
- PvP Arenas
- Again this rev you may request barrier blocks for your PvP arenas. Please specify in your modreq which blocks you would like replaced with barriers (make them something different so we can replace them correctly).
- You may also request an open-air arena provided the arena is set to disallow enderpearls and there is a wall that prevents players from entering except at designated entrances.
- All other PvP arena rules still apply.
- PvP arenas must be clearly marked, completely enclosed, and access-restricted builds - the area must only be accessible via iron doors that require a button press to enter.
- These entrances must be marked with signs stating that it is a PvP area, and that players enter at their own risk. The PvP-enabled area may not exceed 100x100 blocks, and may not interact with other PvP areas in any way.
- Enabling of the PvP flag will be done entirely at the discretion of server admins.
- Spleef Arenas
- You are allowed to request barrier blocks for spleef arenas - please specify in your modreq which blocks you would like replaced with barriers.
Chairs
Having guests for supper? Now you’ll be able to sit down in a proper chair (staircase) of your choice! To sit in a chair, you must type /chairs on and right click on the staircase. To disable, type /chairs off
Custom Recipes
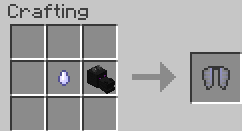
Elytra
- Dragon head + Essence of Flight
- Dragon Heads can be obtained by killing the End Dragon.
- Essence of Flight: Obtainable from killing naturally spawning hostile or flying mobs.
- Dragon head + Essence of Flight
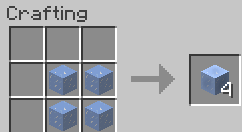
Packed Ice
- 2x2 grid of ice
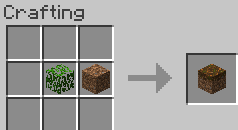
Podzol
- Grass + Leaves
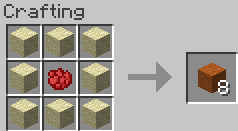
Red Sand
- 1 red dye surrounded by 8 sand = 8 red sand
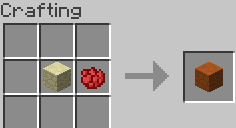
Red Sandstone
- 1 red dye + 1 sandstone = 1 red sandstone
Custom Use Items
Thanks to ShroomWithAView, you can now change the texture of huge mushroom blocks and logs by right clicking on them with dyes. The dye will be consumed upon use. You must have permission to edit the block whose texture you want to change. That means the block must be in a region that you are a member of, or unprotected (in the global region).
Mushroom Blocks
The effect of dyes on mushroom blocks are as follows:
- red dye changes the clicked block face to the red mushroom cap texture
- brown dye changes the clicked block face to the brown mushroom cap texture
- yellow dye changes the clicked block face to the pore texture
- bone meal changes the clicked block to the stem texture
- If you are crouching when you click the block, then all block faces will be changed simultaneously to the texture corresponding to the dye.
Logs
Right clicking on a regular log with bonemeal changes its texture to bark on all sides. If you right click bonemeal on an all-bark log, the texture of the clicked side and the opposite side will be set to growth rings.
Stone & Sandstone Double Slabs
Right clicking on stone or sandstone double slabs with bonemeal will change them to their seamless texture. Clicking bonemeal again will change them back to their normal texture.
Custom Spawners
Custom spawners must be used within 2 weeks of the initial discovery date; or else the rights will be forfeited.
Custom Spawners will be placed by admins before the rev launches.
- To claim a Custom Spawner
- You must locate the pre-placed double bedrock block and claim sign.
- Click the sign to claim the custom spawner
- Custom Spawner Guidelines:
- Custom Spawners may be moved up to 100 blocks from the original pre-placed double bedrock block.
- 100% of drops must be available to the public, either in a public chest, or available for players to pick up at a killing floor.
- You will have 48 hours to decide on your placement of the custom spawner, after that a PAdmin will place the Custom Spawner at the location of the pre-placed double bedrock block.
Click here for a list of Found Custom Spawners
Doppelgangers
The Doppelganger plugin, written by totemo, will be active again and gives players the ability to obtain player heads as well as provide an extremely difficult mob boss to fight.
- Standard Doppels
- Simply name a pumpkin on an anvil to the name of the player whose head you wish to obtain (note that this is case sensitive; “Notch” will give the proper Notch head while “notch” will give something else).
- Place this pumpkin on top of two vertically stacked diamond blocks. Lightning will strike as your stack of blocks transforms into a powerful diamondclad monster, wearing the player head you seek!
- The head can be found in the monster’s remains once you’ve bested it in combat.
- Padmin Doppels will NOT drop dragon heads in the early part of the revision.
- Padmin Doppels
- Create a T shape with diamond blocks, and place a pumpkin named after a current padmin on top - this will spawn doppels of all padmins.
Word of warning: they’re deadly. As with other forms of indirect unwanted PvP, do not spawn these intentionally to murder players.
Easy Rider
This rev brings Easy Rider, a plugin by Totemo to allow for horses to level up rather than breeding for stats.
- Horses start out at level 1 in each of these three abilities. Horse attributes (health, jump and speed) improve in discrete steps when the level of that ability is increased to the next whole number.
- Speed: A horse’s speed increases according to the total horizontal distance traveled on the ground by the horse while carrying a rider.
- Jump Strength: A horse’s speed increases according to the total horizontal distance traveled in the air by the horse while carrying a rider. Fall distance does not count. You can make the horse jump, ride it off a cliff, or just ride it up and down slopes to improve jump strength.
- Health: A horse’s health increases according to the total mass of gold consumed in the form of golden carrots, regular golden apples and Notch apples. The more gold it takes to craft a food item, the more it improves the horse’s health. Horses eat one food item at a time. You may need to hurt them in order for them to eat golden apples. What does not kill them makes them stronger!
- All types of horses, including donkeys, mules, skeletal and undead horses, have the same maximum level and maximum ability (in this version of the plugin). But other vanilla restrictions remain: only donkeys and mules can carry chests and skeletal or undead horses cannot wear armour.
- Llamas can also be tracked with /hgps and will lock under EasyRider.
As of Jan 25, 2017 CobraCorral and EasyRider have been merged into EasyRider,
for more information see the reddit post
| Command | Description |
|---|---|
| /horse-top <stat> Alias: /htop <stat> |
Shows the rank of all horses on the server. You can specify /horse-top jump, /horse-top speed, or /horse-top health. Output is divided into pages of 10 horses and you can ask for a specific page number, e.g. /horse-top jump 2 |
| /horse-owned [<page>] Alias: /horse-list [<page>] Alias: /hlist [<page>] |
Lists all of the horses owned by you as well as its last known coordinates. You can specify a page using /horse-owned # |
| /horse-upgrades <ability> Alias: /hup <ability> |
allows you to see the maximum level and how much training effort is required to attain each level |
| /horse-levels Alias: /hinfo Alias: /horse-info |
Shows the levels of the horse you are currently riding, or if not riding the horse you click on |
| /horse-gps Alias: /hgps |
find a specific horse that you own /hgps 4 or /hgps <name> Horses can be specified using their unique ID, their number in /hlist or the start of their name. |
| /horse-access Alias: /hacl Alias: /haccess |
Grant or revoke access to your horses. Or display players with access to a horse by clicking on it. Usage: To add a user: /haccess [horse] +[username] To remove a user: /haccess [horse] -[username] |
Hyper Carts
HyperCarts allows players to control the max speed of minecarts.
| Command | Description | Usable by |
|---|---|---|
| /cart-speed help | Show usage help | All Players |
| /cart-speed] | Show your current personal max minecart speed. | All Players |
| /cart-speed <number> | Set a new personal maximum minecart speed. (vanilla is 0.4) | All Players |
Iron Spawners
Iron spawners are back! They are obtainable from the first day, but are more costly at the beginning of the rev and will reduce in cost as the rev progresses. To see how this cost progression works, click this link.
Designing a Grinder: Spawners will need to be a minimum of 8 blocks apart and 5 away from any grinder walls. We have increased the activation range from normal spawners so you can be up to 25 blocks away for them to activate. Additionally, any spawner above 4 will replace an existing spawner rather than give you a 5th to squeeze in.
These grinders require people to be able to access 100% of the drops through chests or a kill zone.
Land Claims
Land claims can be used as a physical barrier with fences on the surface to indicate areas which you intend to build within. There should reasonable entry points through the barrier to remain accessible. Anyone is welcome to build outside of your claim.
- You can use /modreq for admins to investigate a claim if the area is not being used. Admins reserve the right to invalidate any claim for (but not limited to) the following reasons: being too large (larger than you will reasonably use), claiming with multiple users to bypass any size guidelines, removing/changing claims that were not placed by you, claiming an area solely for access to resource mining, encircling another claim in an effort to take over, or violating any other build rules currently in place.
- Closing off travel waterways or building bridges that block players in boats is prohibited. If you find an example of this, please open a modreq and the padmins will investigate this to ensure that the map remains accessible for people to travel in!
- It is best practice to allow a ten block buffer between your claim and the nearest claim fencing.
- How to make a land claim:
- Place borders of fences or cobble walls to demarcate the area you intend to develop, allowing for passage of other players either by door, gate, or carpet atop your fence.
- Place a sign with information on the owner of the claim and when the claim was made. While the sign is not required, it does make claim disputes easier to resolve!
Map World
To Access the map world you will need to use the designated portal at spawn. YOUR INVENTORY MUST BE EMPTY TO USE THIS PORTAL.
- The plot limit is set to 100 plots per person so that the cap won't matter so much. Claim only what you need as excessive claiming will result in warnings and further punishments.
- There will be 204 plots available at the start of the revision, and we now use the NerdPlot plugin, meaning you can claim your plots without a modreq!
- Stand in an empty plot and type '/nerdplot claim
- Use /nerdplot for more info.
To get a map from the MapWorld to the Overworld
- Place an item frame with a blank map at your location in the overworld
- Stand at your item frame and /modreq please give map #____
- map numbers can be found here - this map is #137
- Staff will replace your blank map with the map you've requested
Remember: all nerd.nu rules apply in the mapworld, including those regarding nsfw builds
Mob Grinders
All mob grinders; guardian, iron golem, custom and vanilla must be open to the public. In drop grinders such as the creeper, guardian, and iron golem, 100% of the drops must be available, either in a public chest, or available for players to pick up at a killing floor. All experience grinders must be open for anyone to take advantage of.
Mob Limiting
PvE runs a plugin called MobLimiter that limits the number of mobs (livestock and pets) that may stay in a chunk when it is unloaded - this is to prevent excessively large numbers of mobs when they are not needed. This means that, while you can breed animals up to high numbers, once everyone leaves that area the numbers will be reduced back down to at least a breeding pair.
To compensate for this, mobs spend considerably less time as babies (15 seconds, down from 20 minutes), the cooldown for breeding is similarly reduced (down to 15 seconds from 5 minutes), and mob drops of livestock are plumped. For this and more information, type /moblimiter in-game.
As a rule of thumb, the server starts to lag noticeably if a few hundred mobs are bred in a confined space. Please keep this in mind if you are engaged in mass mob drop harvesting operations.
Nether Portals
Nether portals will be placed by admins before the rev launches. There are 12 outer portals this rev (13 including spawn), each one named after one of the twelve Olympian Gods (spawn is Hades).
- To claim a portal
- You must locate the pre-placed double bedrock block and claim sign.
- Click the sign to claim the portal
- Build a square or rectangular portal frame anywhere within 100 blocks of the bedrock but at ground-level ONLY.
- You may then modreq for the portal to be lit.
- Portal Guidelines:
- Portals must be placed within 100 blocks of the bedrock marker
- Portals must be placed at ground level
- The inside of the portal may not exceed 25 blocks
- If a portal has not been placed within two weeks, we will place a default (2x3) portal at the bedrock location (no exceptions).
- Portal frame must be made from obsidian, but feel free to decorate around it how you see fit!
Places
Places are points of interest on the server that are held to be great examples of the great builders we have on P. Builds that can qualify, at admin discretion, include:
- Community builds, such as towns, with three or more members;
- Builds of significance, such as special mob grinders and other public utilities;
- Nether and End portals;
- Other points at admin discretion.
Players can request a /place by making a modreq where they want it placed. It will be evaluated by server admins and granted at their discretion.
Protections
- Mark the top and bottom corners of your build, and stand at the site. Then type /modreq please protect my build
- Protections are only to prevent grief and other unauthorized edits.
- Protections are not used for "claiming land". Mods will only protect builds (houses, rail, farms, etc.) and clearly established large projects, such as cities
- Requests to protect empty land or to protect a very large buffer around a structure will be denied.
- Land that has been significantly improved through road/plot making or terraforming can be protected at staff discretion
- Hastily made structures that serve no purpose other than to lay claim to an area will not be protected.
- Modreqs asking for the protection of land that has had no or minimal edits made to it will be denied.
- Protections generally will cover the entire area above a structure (to sky limit) and about 10 blocks below the lowest floor.
- We will not protect to bedrock unless your entire structure extends down that far. Underground resources are considered to be public property. Mines, drop shafts, etc. will not be protected.
Region Greetings
You may /modreq for a region greeting to be placed using the following guidelines:
- One greeting per settlement, whether it be a town or city or yourself out in the wilderness. (Citizens of a town are considered part of the town for this purpose.). Greetings for non-settlement regions (eg. rails) are not eligible.
- You may request ONE color for your region greeting.
- The region which the greeting is placed must be a parent (it cannot itself be a child of any other region)
- Only the region owners may request a greeting.
- The greeting content must adhere to chat rules and additionally cannot reference any settlement or region or player other than your own. (For example, if you are a mayor of <town A>, you may request as a greeting “Welcome to <town A>!” but not “<town B> is not welcome here!”)
- Staff reserve the right to deny frequent greeting changes. Pick your greeting carefully!
Spawn Apartment Plots
- Floors 3-11 are available for building/decorating. To request a room please use "/modreq May I please have this room?"
- You may edit the inner walls and floors as you like. Any edits of outer walls will result in your edits being rolled back and your removal from spawn. This includes the balcony door!
- Towns may request a room to decorate as embassies.
- Water flow is not permitted in any spawn room.
Please note: This section of wiki is an "In Progress" and may be updated as the rev goes on. Please check back often!
StandMaster
Standmaster allows players to pose armor stands. More information can be found on the StandMaster github page.
- Data Types
- BOOLEAN: Either true or false. Any input other than true in a boolean field will default to false. Examples: true, false
- INT: An integer. Examples: 0, 123, -456
- FLOAT: A floating-point (decimal) value. Examples: 0, 3.14159, -0.0833
- STRING A string of characters, or normal text. Examples: "Dumbo52", "StandMaster9000", "Hello world!" (without the quotes)
- ROTATION A group of three floats, representing rotations (in degrees) around the X, Y, and Z axes respectively.
| Command | Description |
|---|---|
| /stand reload | Reloads the plugin's configuration |
| /stand persist <BOOLEAN> | Prevents your modifier list from clearing |
| /stand preset <name> | Loads a modifier preset |
| /stand preset add <name> | Adds a personal modifier preset |
| /stand preset remove <name> | Removes a personal modifier preset |
| /stand preset addglobal <name> | Adds a global modifier preset |
| /stand preset removeglobal <name> | Removes a global modifier preset |
| /stand list | Shows your current stand modifier list |
| /stand clear | Clears your current stand modifier list |
| /stand name <STRING> | Gives the stand a visible nametag |
| /stand invisible <BOOLEAN> | Makes the stand invisible |
| /stand nobaseplate <BOOLEAN> | Removes the stand's baseplate |
| /stand nogravity <BOOLEAN> | Prevents the stand from falling |
| /stand pose body <ROTATION> | Sets the stand's body rotation |
| /stand pose leftarm <ROTATION> | Sets the stand's left arm rotation |
| /stand pose rightarm <ROTATION> | Sets the stand's right arm rotation |
| /stand pose leftleg <ROTATION> | Sets the stand's left leg rotation |
| /stand pose rightleg <ROTATION> | Sets the stand's right leg rotation |
| /stand pose head <ROTATION> | Sets the stand's head rotation |
| /stand showarms <BOOLEAN> | Shows arms on the stand |
| /stand small <BOOLEAN> | Makes the stand smaller |
Villagers
Villagers have always been a fickle part of the server; keep them hidden away or out and available to the public? Well, hopefully that problem is now solved! Thanks to Redwall, villagers can now only be damaged by region members in the region they are in, and their trades are now logged. If one happens to be griefed and you don’t have a region, or if a region member themselves have griefed one, they can now be replaced!
Water Flow
Region owners can flow their own water. Simply place the water as normal, type /flow, and punch the water with an empty hand. The /flow command will toggle flow on/off, so keep an eye on your screen.
- If you do not turn off the flow (by running /flow again) after 5 minutes it will toggle off automatically.
- If you break someone’s build or redstone with flowing water, this will still be considered grief, so be careful and take steps to ensure you don’t flood someone’s basement!
Likewise, if you break your own build with water, we will not fix it for you. You break it, you fix it.
Waypoints
Waypoints are similar to having your own personal /place, which you can then share with others to point them to your location of choice!
- To create a waypiont type /setwp <name> [unlisted|public|private]
- To delete a waypoint type /delwp <name>
- To list your (or another users) waypoints type /listwps [username]
- To access a waypoint type /wp [playername] <waypoint>
Additional Commands for Users
Below are commands that you can you use on PvE to help make things more fun!
Requesting Help
- /list - displays a list of all players on the server, with staff noted
- /list-all - displays a list of all players on all servers, with staff noted
- /modlist - displays a list of all staff currently online
- /modreq <message> - submits a mod request for staff to respond to
- /check - shows the status of your open modreq
- /done #### - allows you to close your open modreq if you wish
Communications
- /msg <username> or /m <username> - sends a private message to a user
- /r - responds to the last private message sent
- /clanchat - displays the list of all clanchat commands
- /c #<channel> - sets your default clanchat channel
- /c <message> - sends a message to your default clanchat channel
- /cq #<channel> <message> - sends a message to any channel without changing your default
Miscellaneous Commands
- /stand - displays options for the STANDMASTER9000 plugin (used for custom armor stands)
- /ccorral - displays options for the Cobra Corral plugin (used for horse management)
- /who - shows who is in the overworld, nether, end, and mapworlds
- /wp death - shows the automatic waypoint of your last death
- /place - displays a list of admin-placed places
- /map - displays a list of URLs to the nerd.nu livemaps
- /help - displays a help file for PvE containing submenus with additional information
- /nextrestart - displays minutes until the next restart
- /moblimiter - displays information about the current moblimiter configuration
- /lwc - displays additional commands for the LWC plugin used for chest access
- Chat Programs - provides connection information for our out-of-game chat programs
- /irc
- /mumble
- /discord
FAQ
Why won't my water flow?
Our server uses a plugin called SafeBuckets to prevent liquids from flowing as a grief prevention measure. To make your water/lava flow place the static block and then type /modreq please flow this liquid. If you are the owner of your region you can flow liquids within your region by typing /flow and then clicking the static block.
Can I use someone else’s farm?
You can use any farm (crop or mob) built by players as long as you replant (crops) or leave their original mobs when you leave.
How close can I build to my neighbor?
Do not build very close to other players without their permission - buildings that violate this rule may be moved to a new location without warning. Building outside of a claim fence though is ok but consider asking the other party before doing so out of courtesy. If you have a large project such as a city or megabuild, expand in directions that do not come into conflict with other players. Exhaust all available unopposed routes before expanding near already established players. If you must expand in the vicinity of other players, speak with them first and see if they are willing to participate in your project. Leave signs, /mail send, or /msg them in chat. If you are unable to come to an agreement, contact a moderator for assistance.
Can I use potions?
Non-harmful potions are allowed on PvE. Harmful potions will have no effect (except during designated events).
Why can’t I make a portal?
Portals are restricted on our servers to prevent inadvertent grief due to them automatically generating inside someone’s build. See Nether Portals
What do I do if I find a water-level bridge?
Open a modreq and the padmins will investigate this to ensure that the map remains accessible for people to travel in!
Can I have blocks such as trapdoors made non-interactable?
Some people would prefer such blocks to be made non-interactable once set up in their region so that the aesthetics don’t get messed with. You can modreq this and a padmin will take a look into your request.
Are there any blocks I can’t place?
Any block you can place in single player survival you can place on PvE.
